
What is a Gate?
A gate, sometimes known as a noise gate, or audio gate, is one way in which you can attempt to combat unwanted noise in your audio signal. Simply put, gates are either open or closed: When they’re open, audio is allowed through. When they’re closed, audio is attenuated or not allowed through at all.
Somewhat comparable to a compressor, which attenuates signals above a threshold, gates on the other hand, attenuate signals that are below a certain threshold.
Most gates have the following basic controls:
Threshold: This is the level beneath which audio will be attenuated
Attack: This is how long it will take once the threshold has been passed for the gate to open and allow audio through
Release: This is how long it will take for the gate to close once the incoming audio signal passes below the threshold
Hold: This is the amount of time the gate stays open before closing again
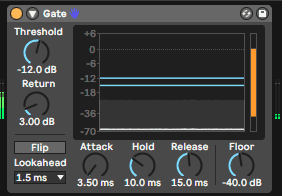
Floor: This control specifies the amount of attenuation the gate will apply to the audio signal when the gate is closed. At -40db (as in the image below) the audio signal that is below the threshold will be attenuated to -40db. If this were set to Inf (infinity), then the gate would entirely mute the incoming signal when it is below the threshold.
Why Use Gates?
In the marching activity, gates are most commonly used to try and negate wind noise. Here is a very simple example: If there is a constant audible noise signal present (let’s say at -40db), and the amplitude of the signal that you want to hear resides primarily around -20db, for example, you can set your gate threshold to be somewhere between -40db and -20db, so that the gate decreases or entirely attenuates the below-threshold signal, depending on where your floor is set (more on that in a moment).
How to Use a Gate:
Step 1: Gates, when used normally, are always placed as an in-line audio effect. This means directly on the audio channel the gate is affecting. Where your gate is placed is only something you will have to worry about if you are using a DAW like Ableton or MainStage, mixers will typically not give you an option to use a gate like a send/return effect.
Step 2: Set your Threshold max (likely 0db) and all the other control to minimum. At this point you should hear no sound, as the gate is fully attenuating 100% of the signal.
Step 3: Lower the Threshold slowly until signal is passing through. At first you’ll only be able to hear the loudest parts of the signal coming through in little bits and chunks of sound, but as you continue to lower the threshold you’ll start to get a more consistent stream of audio. Keep lowering the threshold until you are hearing all of the sound you want to hear, and none of the sound you do not want to hear.
Step 4: Adjust your Attack time, if necessary. Most likely you’ll want a very short attack time for front ensemble amplification
Step 5: Set your Hold until the gate is open for a long enough time to allow the audio to pass through naturally, without chopping any of the signal you want out. With this parameter set too low, you might hear some audio “chatter” as the gate rapidly opens and closes.
Step 6: Set your Release parameter to adjust how slowly the gate closes…a gate with too fast of a Release time will sound unnatural and choppy.
Step 7: Adjust the Floor. This is sometimes called that Range as well, and it controls how much the gate attenuates the signal. Setting the floor to lower the signal when below the Threshold rather than entirely muting it might achieve a more natural sound.
Gates are a fantastic way to clean up and isolate an audio signal, and ultimately, how you set your gate us is extremely situation-specific, and all about what sounds good to you.